A timber arbour

A timber arbour
Handyman magazine

Large enough to span a path and act as an entranceway, it’s made from treated pine for durability with no special tools required.

Most of the cutting and joinery can be done in the workshop, then it will take about half a day to assemble the arbour in its final location.

Save time by using a brad nailer when building the latticed sides, and a tablesaw for cutting the timber. If you don’t have these tools, a hammer and circular saw will still do the job.

Allow a full weekend to build the arbour, applying an oil-based stain to protect the timber, then plant climbers to train over the lattice.

A simple structure

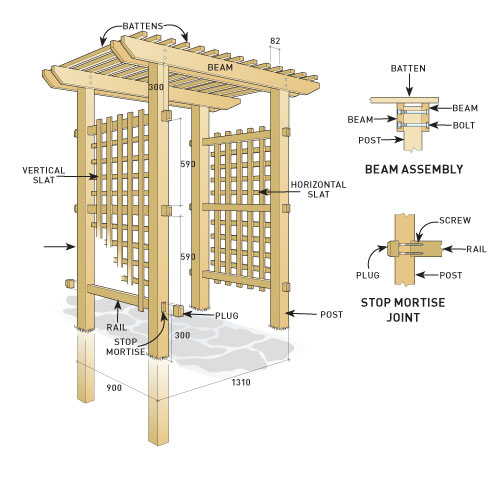
The arbour is made of four posts concreted in the ground and joined by rails, then slats attached to make the latticed sides. The top consists of beams and battens.

The rails are secured in shallow housings called stop mortises in the posts, with matching timber plugs on the other side to create the illusion the rails go the whole way through.

A drill press is the best tool for drilling perfectly vertical holes in timber and will speed up cutting the stop mortises, or you can use a drill guide with a depth collar.

A Forstner bit is designed to cut wide, shallow holes with a flat base, so it is the best type to use when cutting the stop mortises. Drill pairs of holes to remove most of the waste, then square up the corners with a chisel.

Unlike a spade bit, it has a short central spur and sharp, level blades mounted on a flat disc to make it easier to control and more precise.

Exterior timber

The garden arbour is built from 90 x 90mm treated pine posts rated H4 for in-ground use, with the rails, beams and slats cut from H3 rated treated pine.

Use a tablesaw to cut the slats to size from 70 x 45mm timber stock, getting three 20mm thick sections from each length. Cut the battens from 90 x 45mm timber, getting two 40mm thick sections from each length.

If the arbour is to be painted, you can use pre-primed, H3 LOSP finger-jointed treated pine in 42 x 18mm and 42 x 42mm sizes.

Cutting the beams

For the decorative tapers at the beam ends, use a circular saw or mitresaw to cut 100 x 100mm triangles off the base corners.

Round over the edges slightly using a block plane or trim router with a 6mm roundover bit.

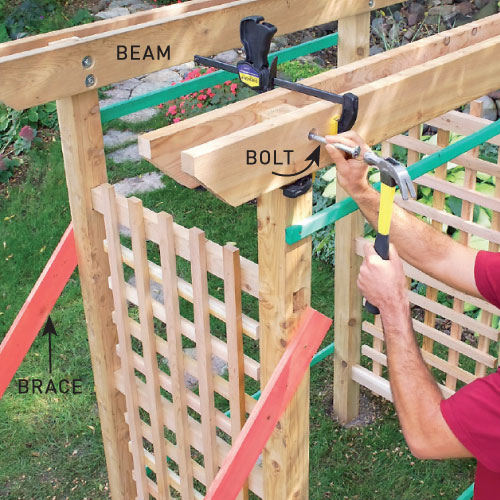
Mark the positions for the bolt hole centres 295mm from the ends, and 30 and 100mm up from the base edge of the beams.

Bore the 13mm deep recesses for the bolt heads and nuts on one face of each beam using a drill and 25mm spade bit. To drill the bolt holes the rest of the way through, use a 10mm twist bit.

Advertisement

Step 1. Cut stop mortises

Step 1. Cut stop mortises
Handyman magazine

Position the posts side by side then clamp, using a builder’s square to mark the locations of the stop mortises for the rails and plugs. Use a 35mm Forstner bit to drill overlapping holes 20mm deep at each marked location, cutting away the waste with a 25mm chisel.

Learn how to recess hinges on a door.

Step 2. Secure the rails

Step 2. Secure the rails
Handyman magazine

Insert the rails into the stop mortises between two posts, stand the assembly on edge and tap the pieces together until the inside measurement between the posts is 720mm. Secure with pairs of screws through the stop mortises. Apply a coat of sealer or paint to the stop mortises.

Step 3. Attach the slats

Step 3. Attach the slats
Handyman magazine

Square up the frame, then make 200 x 82mm spacers from offcuts, with 50mm wide stop blocks. Use a brad nailer to secure the vertical slats to the rails with 50mm overhang. Turn over the assembly to attach horizontal slats to the vertical using construction adhesive and brads.

Check out these basic finish nailer tips.

Step 4. Erect one side panel

Step 4. Erect one side panel
Handyman magazine

Lay out the arbour dimensions on the site and dig four post holes, 200mm in diameter and 650mm deep. Tamp the base of each hole and add 100mm of gravel for drainage. Erect one side panel, checking for plumb and bracing the posts to pegs hammered into the ground.

Learn how to plan and build a deck.

Step 5. Concrete the posts

Step 5. Concrete the posts
Handyman magazine

Stand the second side panel in the holes, clamping supports to the posts at ground level if needed, then attach temporary braces to hold it plumb and evenly spaced from the first panel. Measure the diagonals to ensure the structure is square, then concrete all four posts in position.

Learn how to properly mix concrete.

Step 6. Install beams

Step 6. Install beams
Handyman magazine

Drill 10mm bolt holes centred 30 and 100mm from the top of the posts, clamp the beams in position and bolt them to the posts. Secure the battens across the top of the beams with twist nails, using spacers for equal gaps, then attach the plugs in the stop mortises using adhesive.

Diagram

Diagram
Handyman Magazine

Zoom in on the diagram to see each component of this arbour.

Cutting list

Cutting list
Handyman Magazine

Here is the cutting list to see what materials you will need for this project, and in what size.

Fastener list

Fastener list
Handyman magazine

Here is the fastener list to see what fasteners are needed for this project.

Sign up here to have Handyman’s favourite stories straight to your inbox.

Sign up for emails