DIY Laundry Makeover

An awkward and under-utilised room gets a spotless refit on a DIY budget.
The laundry is usually the most neglected room in the house, often last on the renovation list and the one with the smallest budget.
Yet despite its unglamorous nature, the laundry will see enough use to warrant a well-planned renovation to make it more functional.
The laundry of this 1950s home had seen better days. Detached from the house, it served as a dumping ground for junk and felt more like a shed.
With no proper storage, the room was in chaos. An affordable cabinet system from the Flatpax Utility range was installed to keep things tidy and accessible.
Flatpax Utility cabinets come with the cabinet, doors, hinges and relevant assembly hardware in the one box. All that needs to be added is a benchtop.
The deep cupboards provide plenty of storage for household supplies while concealing unsightly items. A new laundry chute means the hamper can go, reducing clutter in the room.
A clever new feature is the drying cupboard installed above the cabinets. It allows clothes to be dried indoors without taking up floorspace and looks neat and tidy when not in use.
Update the surfaces
The walls and ceiling hadn’t been painted in at least a decade, so the room looked tired and grubby, and was filled with cobwebs.
Mouldings covered plasterboard joints and there was an unsightly patch of bare wall where a cupboard had once been removed.
To revamp the walls, the mouldings were taken away and the gaps between the panels were filled with joint compound then sanded.
A blue-grey shade of low-sheen interior paint was chosen for the walls, along with white for the ceiling, to give the new laundry a clean, fresh look.
The stark concrete floor slab was heavily stained, and seemed more suited to a warehouse than a laundry.
Large-format floor tiles were laid directly on top of the slab from front to back and left to right. This technique allows any cut tiles to be hidden by the cabinets and makes the end result look much neater.
Large tiles are a cost-effective and attractive option to install DIY. Not only do they make a room look bigger and more streamlined, they are far less fiddly and time consuming to lay than smaller tiles.
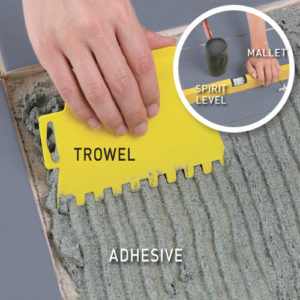
Lay the floor tiles
Calculate how many tiles you need by measuring the length and width of the floor and adding 5% extra for wastage. When laying tiles square to walls, lay full tiles first then cut tiles. Dry fit the tiles before laying them to check positioning.