Avoid ugly hammer marks

Avoid ugly hammer marks
FAMILY HANDYMAN

Nails are easier to drive if you take a full swing. But the downside is that if you miss the nailhead, you’ll leave a deep ‘elephant track’ in the decking. Use a 6mm plywood cushion to protect the deck boards in case you miss with a hammer. It allows you to concentrate on nailing without worrying about denting the deck boards. Simply start the nail. Then slip a small square of 6mm plywood over the nail and swing away. Remove the plywood for the last blow.

Advertisement

Testing mitre cuts

Testing mitre cuts
FAMILY HANDYMAN

An easy way to test whether your table saw is set to 45 degrees is to cut off a short length of your trim, then hold it to a square. A gap means your angle is off.

Follow these tips for tighter mitres.

Circle gets the square

Circle gets the square
FAMILY HANDYMAN

Here’s a magical way to trace arcs and circles for project parts. Tap two finish nails at the ends of a desired diameter, then rotate a framing square against the nails while holding a pencil in the square’s corner. Spray the underside of the square with silicone or rub on some paraffin so it’ll glide smoother. Then practise a little to get the feel of the three-point contact technique.

Which way to tighten wood clamps?

Which way to tighten wood clamps?
FAMILY HANDYMAN

“Hand screw wood clamps are some of the most useful and versatile tools in my shop. But I always forget which way to rotate them to make them larger or smaller, and more than half the time I make the wrong choice. Now, I draw an up or down arrow on the clamp ends along with the words “larger” and “smaller”. No more guessing!” – Kenneth “Doc” Gregie

Check out our essential guide to clamps.

Caulk gun clamp

Caulk gun clamp
FAMILY HANDYMAN

Did you know that you can use a caulk gun as a clamp? It’s perfect for gluing up small projects such as a cutting board. Just place a couple of pieces of scrap wood or cardboard at the ends of the caulk gun and then squeeze the trigger to apply pressure.

Customised chuck key

Customised chuck key
FAMILY HANDYMAN

If you’ve ever scraped your fingers when tightening a drill chuck, you’ll love this tip. First measure the diameter and length of the chuck key’s handle and drill a matching hole in the end of a 100mm x 20mm-diameter wood dowel. Then hold the handle in a vice and tap the dowel onto the chuck with a hammer.

The advantages? Besides no longer scraping your fingers on the gears, you’ll have increased leverage with less effort and a much more comfortable grip when tightening the chuck.

Flush-cutting hacksaw

Flush-cutting hacksaw
THE FAMILY HANDYMAN

Trim dowel plugs flush on fine furniture projects without scarring the adjacent surface. Apply a couple of layers of masking tape or a single layer of duct tape to a hacksaw blade with an untaped section between for sawing. While you’re sawing, the tape elevates the blade a smidgen so it can’t scratch the surrounding wood. After sawing, lightly sand the dowel to even it with the wood.

Don’t miss our essential guide to manual saws.

Putty knife hack

Putty knife hack
FAMILY HANDYMAN

Plasterboard screws are very useful. Not only can you use them for their main purpose, but they’re ideal for attaching metal to wood, and many people use them instead of wood screws. However, if you try to remove a plasterboard screw that has missed the stud, it’ll just spin and it won’t come out. So, to get the screw to back out, stick the edge of a putty knife under the screw’s head and apply some outward pressure as you back out the screw. Viola! It will come right out without hassle.

Adding a key-holed ruler to your bench

Adding a key-holed ruler to your bench
FAMILY HANDYMAN

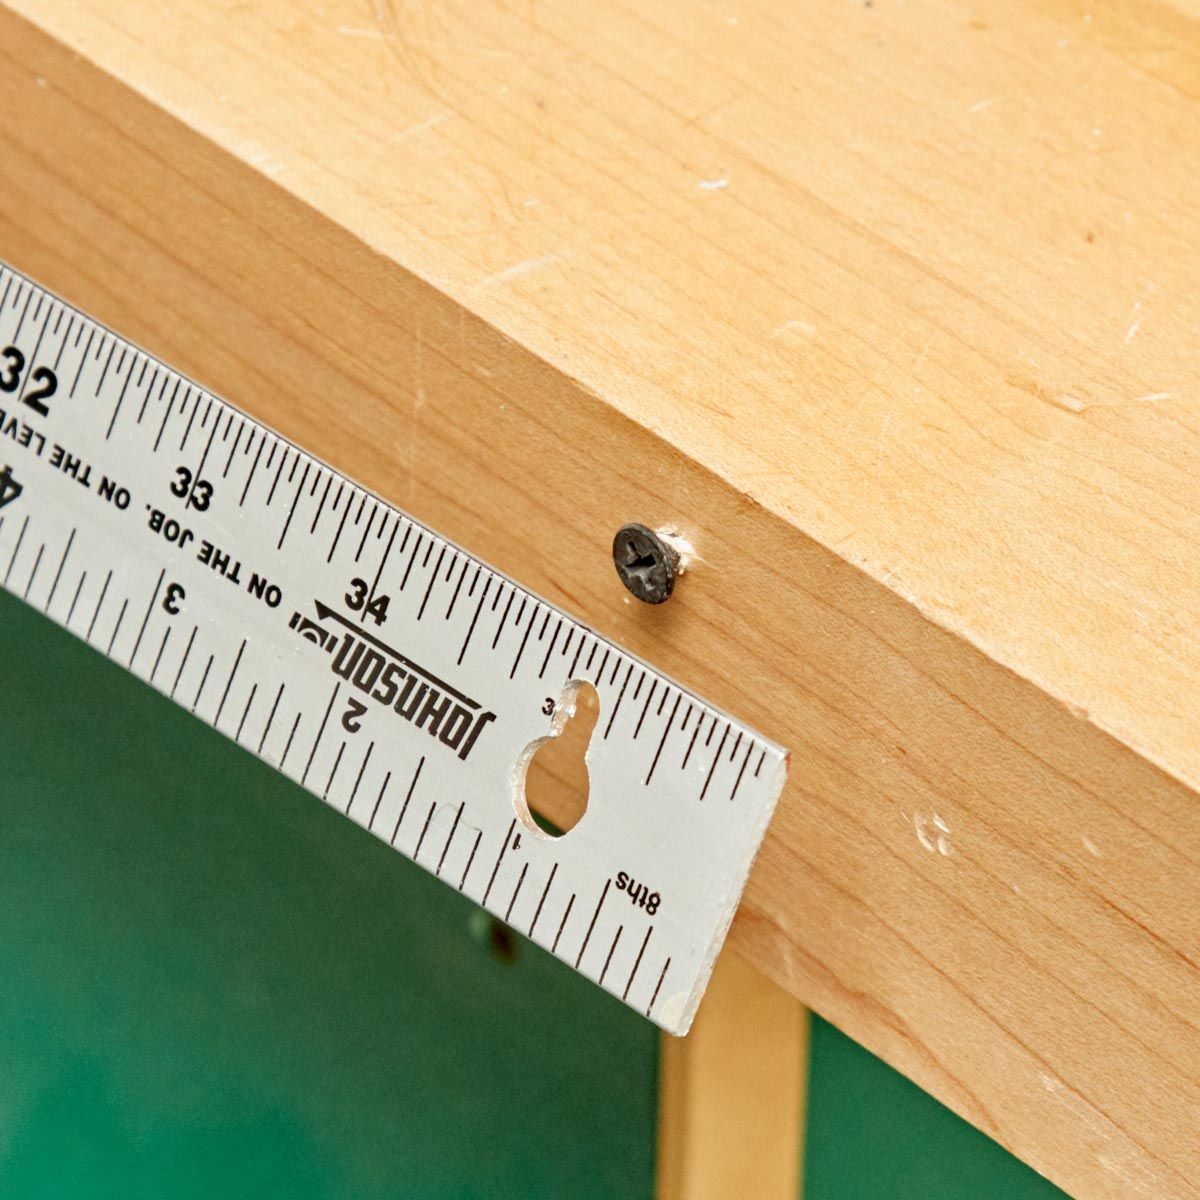
You can mount a removable key-holed metal ruler on the front edge of your workbench, for both easy measuring on the workbench and for easy access for measuring and marking projects elsewhere. Simply drill keyholes (a larger hole with an overlapping smaller hole above it) in two locations along the ruler. After drilling the keyholes we sanded them smooth to get rid of the potentially dangerous sharp edges. Next, drill appropriately sized screws (ones that will fit into the smaller sized keyhole) to the front of the workbench and use the keyholes to mount the ruler to the bench with screws.

Also, it is important to note that we placed our screws in a location in which the ruler would lay flush with the edge of the workbench. This makes it extremely easy to use the ruler for quick project measurements because of its convenient location.

Here’s our essential guide to measuring and marking tools.

Mini plasterboard saw

Mini plasterboard saw
FAMILY HANDYMAN

A coarse jigsaw blade mounted in a scrap of wood makes a handy little plasterboard saw. It’s easy to carry and is good for cutting around electrical boxes and other tight spots.

How to hang plasterboard: pro tips for cutting and installing.


Sign up for emails