Protect benchtops with masking paper

Protect benchtops with masking paper
FAMILY HANDYMAN

Painting cabinets is a messy job, and the last thing you want is paint all over your benchtops as you learn how to paint kitchen cabinets. An easy way to protect your benchtops, splashback and floor is to cover them with inexpensive masking or brown builder’s paper.

Not protecting your surfaces first is definitely one of the painting shortcuts that do more harm than good

Advertisement

Get the grease off

Get the grease off
FAMILY HANDYMAN

Even the best paint for kitchen cabinets won’t stick to greasy cabinets. So the first critical step in preparing to paint kitchen cabinets is to clean them with a grease-cutting solution. Dishwashing liquid will work, but a dedicated grease remover is even better.

Mix according to the instructions and scrub the cabinets. Then rinse them with clear water and wipe them dry with a clean rag.

Here’s how to clean the 16 dirtiest items in your home

Remove doors, drawer fronts and hardware

Remove doors, drawer fronts and hardware
FAMILY HANDYMAN

We’ve all seen painting projects where the hinges and hardware are covered with paint and paint is slopped over drawer interiors. It’s tempting to leave the doors in place for painting as you begin your project, but you’ll get a much neater and more professional-looking job by removing them, as well as all the hardware.

On many modern cabinets, drawer fronts can be removed from the drawer by backing out a few screws. But if your drawer fronts are part of the drawer and can’t be removed, use masking tape to cover the drawer sides and bottom if you don’t want to paint them.

Want to upgrade your hardware as well? Follow our tips for replacing cabinet handles and drawer knobs.

Label doors

Label doors
FAMILY HANDYMAN

Start by making a quick sketch or two showing all the doors and drawers of your kitchen cabinets. Number them however you want.

Then label the doors and drawers with the corresponding number when you remove them. Write under the hinge locations where it won’t be visible. Then cover the numbers with masking tape to protect them while you’re painting.

Don’t go overboard on sanding

Don’t go overboard on sanding
FAMILY HANDYMAN

You should sand cabinets before beginning your kitchen cabinet painting project to give the new paint a good surface to grip. But you don’t need to sand to bare wood.

If your cabinets have a factory finish, sand lightly with 120-grit sandpaper or a sanding sponge. If the surface is rough from a previous paint job or poor varnishing job, start with coarser 100-grit paper to remove bumps. Then sand again with 120-grit to get rid of any sanding marks.

Here are more genius sanding tips you need to know.

Choose a fast-drying primer

Choose a fast-drying primer
FAMILY HANDYMAN

Want to speed up the project? Choose a fast-drying primer for the first coat. Read the label for information on recoating time and to make sure the primer is compatible with the paint you’re planning to use.

Pro Tip: Use an enamel underbody primer. Water-based paint has come a long way, and some top-quality acrylic alkyd hybrids rival oil-based paint. Still, many pro painters prefer oil-based paint, especially for priming.

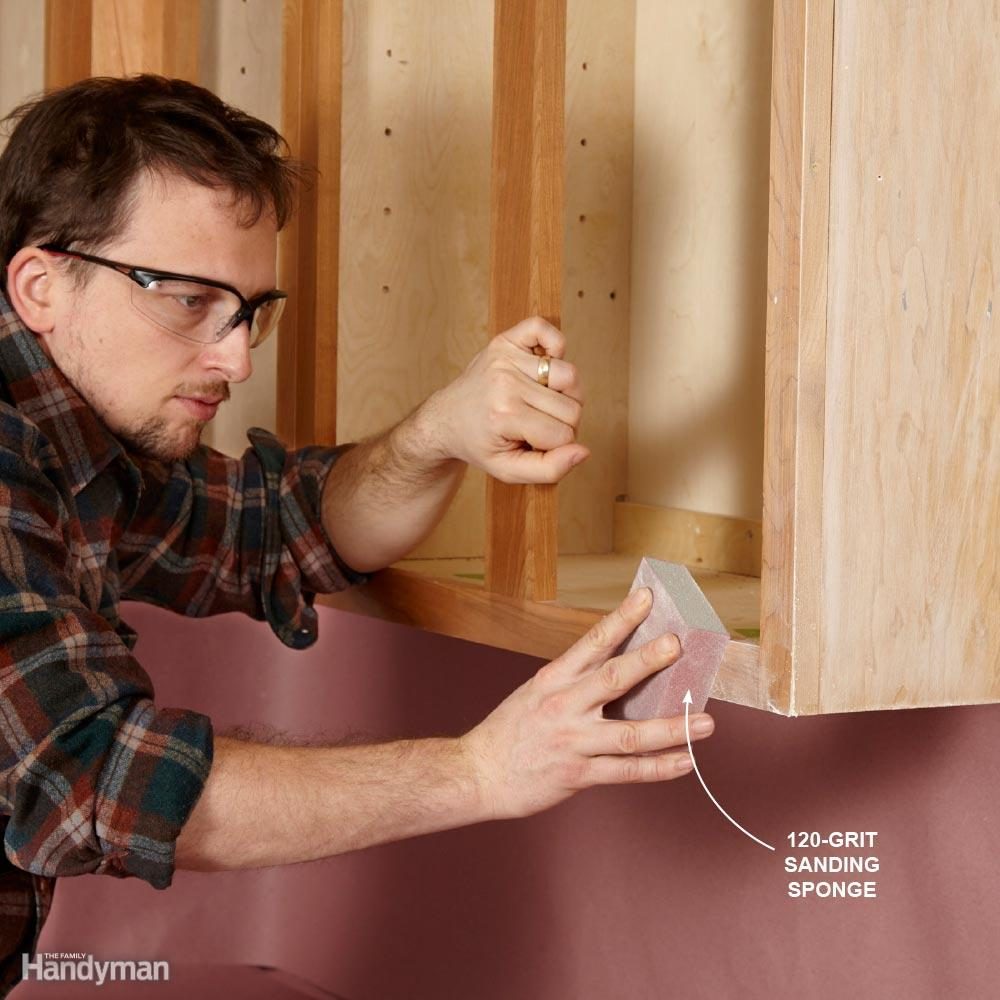
Oil-based paint dries slowly and levels well. This gives you more working time and fewer brush marks. Also, when they’re dry, oil-based primers sand easily, providing a perfect base for your finish coat.

Acrylic urethane has many properties that make it a perfect primer for cabinets. First, it sticks tenaciously to almost any surface. You could even paint over plastic laminate cabinets with acrylic urethane, as it cures to a very hard and durable finish. You can use acrylic urethane primer and cover it with your choice of paint. Or you can use acrylic urethane paint as the final coat too.

Consider filling open grain

Consider filling open grain
FAMILY HANDYMAN

Some types of wood have grain with many open pores. Oak is a good example. The pores show through finishes and are especially noticeable under paint. It’s OK to leave the grain showing, but if you want a smooth, grain-free look, you’ll have to fill the pores before painting.

There are a few methods. You can apply several coats of a high-build primer, sanding between coats until the pores are filled. Or you can fill the grain with spackling as shown here. If your cabinets have a lot of curves and moulded edges, filling with spackling is more difficult. When the filler dries, sand and prime as usual to finish the job.

Don’t miss these 30 thrifty painting tricks.

Vacuum, then use a tack cloth

Vacuum, then use a tack cloth
FAMILY HANDYMAN

To ensure a smooth paint job and good adhesion, it’s critical that you remove all the sanding dust from the doors, drawer fronts and cabinet frames. Start by vacuuming everything using a soft bristle brush attachment. This removes loose dust, but you still need to get rid of the rest.

The traditional painter’s method is to use tack cloths. To use a tack cloth, completely unfold it and loosely bunch it up. Wipe it gently over the surface to pick up dust. Shake it out frequently and re-form the bundle to use it again. When the cloth has lost its dust-grabbing ability, throw it away and get a new one.

Support doors on standoffs

Support doors on standoffs
FAMILY HANDYMAN

You can buy plastic painter’s pyramids, which work great for supporting doors while you paint them. Or you can make your own standoffs by driving 8cm screws through 10cm square scraps of plywood. If you don’t mind a few barely visible dimples on the back of your doors, you can paint both sides of a door at once using standoffs.

Here’s how to get started painting your kitchen cabinets. Paint the back first, leaving the edges unpainted so you’ll have a spot to put your fingers when you turn the door over. Paint the back. Then flip the door over and rest it on the screw tips.

Now you can paint the door edges and front, then let the door dry. If you look hard, you can spot tiny indentations where the screws contact the wet paint, but they’re inconspicuous.

We show you how to paint a door.

Double-check for defects after priming

Double-check for defects after priming
FAMILY HANDYMAN

The first paint-prep step after cleaning grease from cabinets is usually filling unwanted holes, dents and dings with spackling or wood filler. After sanding, getting rid of dust and priming the cabinets, it’s a good idea to check everything with a bright light to spot and fill any remaining holes or dents. It’s usually easier to spot these problems after priming.

We prefer filling with an oil-based spackling compound because it sticks well and dries hard for a durable repair. But other fillers will also work. The downside of this additional round of spackling is that you’ll have to reprime the patched areas.

Sign up for emails